
Tutorial: One-pot tea cosy

Happy Mother’s Day to my wonderful Mum! 🙂 Hopefully you have opened your present…I’m about to tell people how to make it!
My Mum has a little one-pot tea pot, and she asked me to make a little tea cosy for it. When I visited her a few weeks ago, I measured it and made a template. It was actually quite tricky to make the tea cosy back here in Newcastle without being able to try it on the teapot, so I hope it fits!
You will need
Some pattern paper (some tissue paper or some parchment paper will work just fine)
A pencil
Some contrasting fabrics for your tea cosy (an outer and inner layer)
Some wadding
A needle and thread
Sharp scissors
A small piece of ribbon
You can make this by hand, or on a sewing machine.
Step 1: Measure your teapot and draw a semicircular shape onto your pattern paper. Make sure that you leave lots of space around the edge so that the cosy will be roomy. You might want to cut out 2 shapes so that you can check to see if they fit around the teapot, and adjust to fit.
Step 2: Take the lining fabric and fold it in half, right sides together. Pin your template on to the fabric, and cut around the edge leaving a 1cm around the template – this will allow for your seams. Then do the same with the outer fabric.

Step 3: Take one piece of outer fabric and one piece of lining fabric, and pin them right sides together. Leave about a 10cm gap at the bottom (for turning out later. Sew around the outside, 1cm from the edge.
Step 4: Clip the edges, turn the right way out and then press. Trim the wadding to size and then fit it inside the cover.


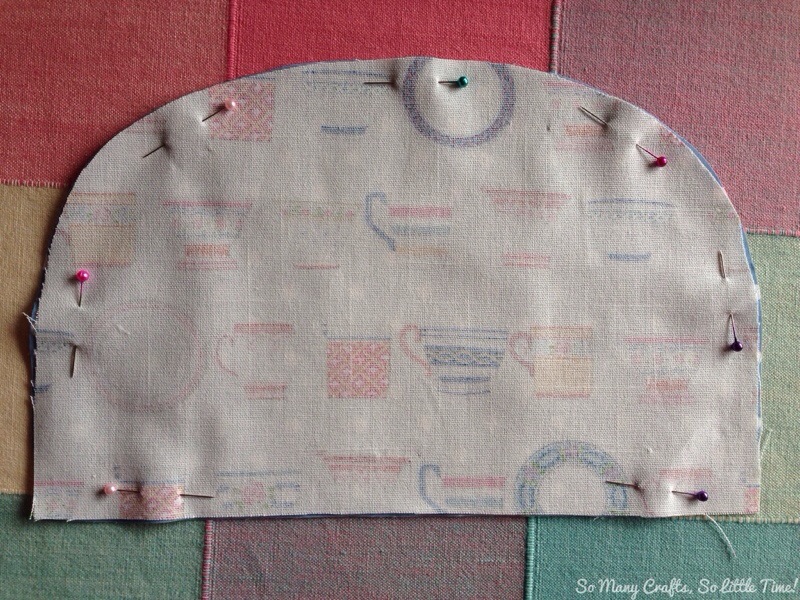
Step 5: Repeat step 4 with the other pieces of fabric and the wadding. Then cut a small piece of ribbon and secure it between the two sides of the tea cosy. Make sure that the ribbon points downward between the two pieces, which should be right sides together. Pin the whole thing together around the curved edge.

Step 6: Sew around the curved edges – this is the point where my old sewing machine decided that it doesn’t like sewing layers! If you’re doing it by hand too, keep the stitches as small as you can.

Step 7: Turn the tea cosy the right way out, and then use slipstitch to close the two open seams along the bottom.
Ta-dah! Time to put the kettle on 🙂

Newsletter sign up
Sign up to my newsletter, 'Take time out to be creative' - it only drops in your inbox once or twice a month, and is packed full of creative inspiration.


Reblogged this on dadartdesign.
looks lovely, gorgeous fabric. Thanks for sharing the method 🙂